





 "
});
"
});

What should you do if you need to create many folders with different names in your computer? I know, generally you click the right button of your mouse, then you click New, then click Folder, then you rename the folder. Then you repeat it to create another folder. But today I will tell you how will you create many folders at once with their different names. To do this, you have to follow my following instructions.
Just imagine, you want to create 7 folders with these names : SOFTWARE AUDIO VIDEO DOCUMENTS MOVIES GAMES PERSONAL
1. Go any drive where you want to create these 7 folders.
2. Then click the right button of your mouse.
3. Then click New from the context menu.
4. Then click Text Document. A notepad will be opened.
5. In the open notepad at first type "MD"
6. After typing "MD" , type your folder's names separating with an space. For example : MD SOFTWARE AUDIO VIDEO DOCUMENTS MOVIES GAMES PERSONAL
see the shot!

7. Then click File from notepad's menu bar.
8. Click Save As... . A Save As window will be opened.
9. Then type "create folder.bat" in File name. Instead of "create folder" you can type anything. But typing ".bat" is obligatory with any name.
see the following shot!

10. Click Save button.
11. After clicking Save button a batch file will be created with the name create folder.
12. Double click on the batch file. Your 7 folders will be created with their own names.


In desktop shortcuts we usually can see an arrow sign. But can't see this arrow sign in My Computer icon or Recycle Bin icon.
You can remove the arrow sign from your each desktop icon by following my instructions.
- At first, go to Run or press Start +R , then type 'regedit'
- Click HKEY_CLASSES_ROOT
- Then expand HKEY_CLASSES_ROOT by clicking the arrow sign.
- Go to lnkfile or type the letter l n k from your keyboard.
- Then you will see isshortcut in right side
- Delete isshortcut by clicking right button of mouse.
- After deleting isshortcut when you restart your computer you will see all arrow signs of desktop icon have gone.

Sometimes in my different post I share some HTML codes in scroll box, so that the codes could be different from other text. Today I am going to tell you how to do this.
For Example, you can check this post where I showed some html codes in a scroll box.
Instructions :
- At first, paste the code in your post editor.
- Then, go to the HTML tab of your browser.
- Paste the following code right before your html codes : <div style="width: 580px; height: 300px; font:10pt/12pt Lucida Console; overflow: auto">
- And write </div> after your html codes.
- You can change the width and height value as your wish.
- Then the html codes must be seen in a scroll box.

Are you worried about stealing your blog posts. Perhaps many unfair people are stealing your blog posts and publishing your blog posts in their blog without your permission. I have also found some thieves who steal my post and publish my post to their blog. Actually, they are 100% mad because blogging by copy & paste is just a kind of time wasting. What should you do to prevent their stealing? Nothing, but you have to read this post. Today I am here to make your blog copy protected so that, no one can copy your blog.
- Log in your blogger account.
- Go Design > Page Elements
- Click Add a Gadget
- Choose HTML/JavaScript gadget.
- Now copy and paste the following codes in the blank HTML/JavaScript .
<?php
}
// no selection header - now your content is protected from copy and paste guys
function copyprotect_no_select()
{
?>
<script type="text/javascript">
function disableSelection(target){
if (typeof target.onselectstart!="undefined") //For IE
target.onselectstart=function(){return false}
else if (typeof target.style.MozUserSelect!="undefined") //For Firefox
target.style.MozUserSelect="none"
else //All other route (For Opera)
target.onmousedown=function(){return false}
target.style.cursor = "default"
}
</script>
<?php
}
// no selection footer
function copyprotect_no_select_footer()
{
?>
<script type="text/javascript">
disableSelection(document.body)
</script>
<small>Copy Protected by <a href="http://for-tech-lovers.blogspot.com/" target="_blank">Shakil Wahid.</a><a href="http://for-tech-lovers.blogspot.com/2011/10/keep-your-blog-copy-protected.html" target="_blank">Protect Yours !</a></small>
<?php
}
// tuning your wp-copyprotect
function copyprotect_options_page()
{
?></?php
}
></?php
}
></?php
}
>
}
// no selection header - now your content is protected from copy and paste guys
function copyprotect_no_select()
{
?>
<script type="text/javascript">
function disableSelection(target){
if (typeof target.onselectstart!="undefined") //For IE
target.onselectstart=function(){return false}
else if (typeof target.style.MozUserSelect!="undefined") //For Firefox
target.style.MozUserSelect="none"
else //All other route (For Opera)
target.onmousedown=function(){return false}
target.style.cursor = "default"
}
</script>
<?php
}
// no selection footer
function copyprotect_no_select_footer()
{
?>
<script type="text/javascript">
disableSelection(document.body)
</script>
<small>Copy Protected by <a href="http://for-tech-lovers.blogspot.com/" target="_blank">Shakil Wahid.</a><a href="http://for-tech-lovers.blogspot.com/2011/10/keep-your-blog-copy-protected.html" target="_blank">Protect Yours !</a></small>
<?php
}
// tuning your wp-copyprotect
function copyprotect_options_page()
{
?></?php
}
></?php
}
></?php
}
>
- Then save your template. That's all.

Today I will show you, how to make ringtones from an mp3 song. You will need a software to do this. The software is MP3 Cutter. It’s a freeware software. You can Download this software from their official website.
Making ringtones by using this software is easier than drinking water. After downloading this software just install the software. After installing run the software. Then you will see the interface of this software like my next shot :

Instructions:
- After opening this program you will see like the screen shot above. Then click Open to select any mp3 song.
- The song will be played after selecting an mp3 song. Then click Set start to start making ringtone from where you want to start.
- Click Set end to stop making ringtone.
- Then click Save Selection to save that ringtone you have just created.

Recuva says “Accidentally deleted an important file? Lost something important when your computer crashed? No problem! Recuva recovers files deleted from your Windows computer, Recycle Bin, digital camera card, or MP3 player. And it's free!”
Absolutely right !! You can recover your all deleted files. Not only you can recover your computer hard disk, you can also recover your friend's flash drive (pen drive) which was formatted in your friend’s computer. When you will scan your friend's flash drive by Recuva, it will recover all deleted data.
By using Recuva all types of data you can recover. Such as : Video, MP3, Picture, Documents, Email etc.
Recuva is the easiest & effective data recovery software I have ever seen. Its using method is so easy that I don’t need to tell more details. Try !
It is a free software (2.5 mb). So, you can easily download this software from this link http://www.piriform.com/recuva/download.
The official website of Recuva is http://www.piriform.com/ .
 Today I am here to present a tutorial about Windows Live Writer because I am supposed to write a post about Windows Live Writer in my previous post. In my previous post, I told you how to create a blog step by step. Please, check my previous post if you don’t read yet the post.
 What is Windows Live Writer
Windows Live Writer is the best blog writing and publishing software. It’s a Microsoft’s free software for blog publishing. You can dramatically customize your blog post using it. Personally, I use it. Each post of my blog is written by Windows Live Writer. If you have written any post ever by blogger default post then you noticed that blogger default post editor doesn’t have the following five features that are available in Windows Live Writer.
- Blogger default post editor has no option for customizing the inserted image.
- Blogger default post editor doesn’t have also any option for increasing or decreasing font size.
- Blogger default post editor has only 7 fonts where WLW (Windows Live Writer) has almost all fonts.
- Blogger default post editor doesn’t have any option for inserting emoticons in blog post.
- Blogger default post editor has no option for inserting table in blog post.
Download Windows Live Writer
Generally Microsoft doesn’t release any standalone or offline installer of their free software. They release a little sized online installer that requires internet connection to install the software. That’s why you can’t download the offline or standalone version of Windows Live Writer from Microsoft official website. But you can easily download the 1.22mb sized online installer of Windows Live Writer.
To download Windows Live Writer click this link http://explore.live.com/windows-live-writer
Personally I don’t like any online installer of any software. Because when I need to reinstall that software, every time it requires internet connection for installing.
You will find the standalone or offline version if you search in Google. Just type in Google “windows live writer 2011 offline installer” . You will get many websites where offline version is available.
See the following shots carefully ! I have written some direction in the following shots. Click on these images to view full screen.
 Click to enlarge this image!
Click to enlarge this image!

Click to enlarge this image!
Blogger default post editor has no option for installing plug-ins which is available in WLW. WLW have numerous plug-ins. You can easily download and install plug-ins. You have already seen my installed plug-ins in the shot above.
To download plug-in, Click Here.

Today I am going to share with you an amazing photo editing software which are totally free. This software is like a package of many features that you are seeing in the circle of above picture. It's an important & useful software for all. Particularly, for blog bloggers. Because they need to take screen shots, need to edit the screen shots, need to type instructions in screen shots etc. I think, your all needs will be fulfilled by this software. You can download this rare software from their official website http://www.photoscape.org/ps/main/download.php .
Here I have copied the features of PhotoScape from their website.

So, check out this software. And if you have any better software please share with us your software by commenting below.

Today my post is about a most essential software Revo Uninstaller by which you can uninstall or remove the installed programs. Without any third party software normally we uninstall or remove any program by going Control Panel > Programs and Features.
But after uninstalling in this normal way some unnecessary junk files or installation files still remain in your hard disk. So, the program can’t be removed or uninstalled clearly. To solve this my best solution is Revo Uninstaller. It will keep your pc fresh and clean. It has not only the uninstalling feature it has also three extra options. That are Autorun Manager, Windows Tools, Junk Files Cleaner.
I am discussing here about the free version of Revo. Although Revo has a pro version. But according to my experience the free version is more better than the pro version. So, download totally free Revo Uninstaller from it’s official website.
आफ्नो भिडियो वा आफुलाई मन पर्ने कुनै गीत अथवा फ्लिमको भिडियो edit गरेर अझ राम्रो बनाउने रहर सबैलाई हुन्छ नै । भिडियो edit गर्ने धेरै software हरु उपलब्ध छन कुनै पैसा तिरेर किन्नु पर्ने त कुनै फ्रीमा उपलब्ध । फ्रीमा नै उपयोग गर्न पाइने software हरु छन जसले राम्रो काम गर्छ भने किन पैसा तिर्नु पर्ने software प्रयोग गर्ने त हैन ? प्राय सबैले यस्तै फ्री मा उपयोग गर्न सकिने software को खोजी गरिरहेका हुन्छन त्यसैले यहाँ यस्तै फ्री मा उपलब्ध केही भिडियो editing software हरु बारे जानकारी दिने कोशीस गरेको छु ।
१) Windows Movie Maker

माईक्रोसफ्टको यो Windows Movie Maker फ्रीमा प्रयोग गर्न सकिने सबै भन्दा सजिलो Video Editing Software हो । यसमा उपलब्ध Tools हरुको सहायताले तपाईंले आफ्नो भिडियो create तथा edit गर्न सक्नु हुन्छ । यसमा भिडियो edit गर्दा काम लाग्ने special effects,add music, Drag-and-drop functionality, धेरै राम्रा राम्रा Transitions का साथसाथै भिडियो effect हरु छन जुन चलाऊन निक्कै सजिलो छ ।
Download गर्न यहाँ क्लिक गर्नुहोला (WinXP मा यो पहिले नै install भएर बसेको हुन्छ तै पनि download link)
विन्डोज xp को लागि download link
विन्डोज 7 को लागि download link

Wax is a high performance and flexible video compositing and special effects software. The idea for Wax is to be very general purpose and flexible in video compositing and effects, so that you can compose your dream video sequence with ease everytime. Wax can create 2D & 3D special effects and can work in two modes – as a standalone application which would appeal for home users/beginners, and as a “plug-in” to video editors/NLEs which would be more useful for professional editors.


१) Windows Movie Maker

माईक्रोसफ्टको यो Windows Movie Maker फ्रीमा प्रयोग गर्न सकिने सबै भन्दा सजिलो Video Editing Software हो । यसमा उपलब्ध Tools हरुको सहायताले तपाईंले आफ्नो भिडियो create तथा edit गर्न सक्नु हुन्छ । यसमा भिडियो edit गर्दा काम लाग्ने special effects,add music, Drag-and-drop functionality, धेरै राम्रा राम्रा Transitions का साथसाथै भिडियो effect हरु छन जुन चलाऊन निक्कै सजिलो छ ।
Download गर्न यहाँ क्लिक गर्नुहोला (WinXP मा यो पहिले नै install भएर बसेको हुन्छ तै पनि download link)
विन्डोज xp को लागि download link
विन्डोज 7 को लागि download link
2) WAX
Wax is a high performance and flexible video compositing and special effects software. The idea for Wax is to be very general purpose and flexible in video compositing and effects, so that you can compose your dream video sequence with ease everytime. Wax can create 2D & 3D special effects and can work in two modes – as a standalone application which would appeal for home users/beginners, and as a “plug-in” to video editors/NLEs which would be more useful for professional editors.
3) Blender

Blender is the fully integrated 3D graphics creation suite allowing modeling, animation, rendering, post-production, real-time interactive 3D and game creation and playback with cross-platform compatibility. Yes, this is its most important feature; it can run on Windows, Linux or Apple’s Mac.
4) SolveigMM AVI Trimmer

SolveigMM AVI Trimmer is a free video editor for fast and lossless AVI editing. This freeware AVI editor is small, smart, easy to use and involves no encoding/decoding processes. No video / audio degradation and out of sync problem arises after editing. All AVI file types of any size and video / audio content are supported.
5) VirtualDub

A powerful freeware video editor with lots of features, including a choice of compression codecs, splitting, addition of audio tracks.
6) ZS4 Video Editor

ZS4 Video Editor is video editing and compositing software which aims to provide media experts with a facility to combine a variety of media types (currently photos, videos and audio files) into one (or more) output file(s).
It is compatible for Windows, Linux and MAC OSX as well.
7) Video Spin

VideoSpin is free video editing software that allows you to create your own movie clips in minutes using your own videos and pictures.
8) Avidemux

Avidemux is a free video editor designed for simple cutting, filtering and encoding tasks. It supports many file types, including AVI, DVD compatible MPEG files, MP4 and ASF, using a variety of codecs. Tasks can be automated using projects, job queue and powerful scripting capabilities.
It works on Windows, Linux and Apple’s Mac as well.
9) AVIedit

It is a great tool to work with .AVI files. Regardless of small executable size, this avi editor offers you unlimited power of digital video processing. Some high-tech tricks included into AVIedit allows you to perform with ease and fun the many interesting things, like video warping, color restore, noise reduction and so on…
AVIedit allows you to join and split avi files, extract frames and do whatever you want. It also allows you to convert avi clips to bmp and bmp to avi, animated GIFs etc.
10) Zwei-Stein

Zwei-Stein 3.01 is a freeware non-linear, non-destructive video compositing and editing system which offers many advanced features. With Zwei-Stein you can edit up to 256 video, audio and still image clips, each with up to 64 effects chained serially. Cropping, panning and custom effects are easy with automatic key frames.
11) DVDVideoSoft Free

A pretty basic software to edit video and audio files. Free Studio is a single package which bundles all free software from DVDVideoSoft to work with DVD, video and audio files. With this free software you can convert video and audio files between different formats and to iPod, PSP, iPhone, BlackBerry and other portable devices; burn and rip DVDs and audio CDs; upload and download videos and music to your computer, iPod, PSP, iPhone and BlackBerry; perform basic editing of audio and video files.
12) Mewa Film

It is a non-linear editing tool, called montage (this name might change) where video files are shown as a sequence of images layed off horizontally. The video files can then be assembled and cuted using intuitive actions as “drag and drop” and “rubberband selection”.

The Code
<marquee behavior="scroll" direction="up"
width=200 height=50
onmouseover="this.stop()" scrollamount="5" onmouseout="this.start()" bgcolor="#191919" align="middle">
Your Text/Image/other HTML code
</marquee>
Add this code to Add a Gadget > HTML/Java script
Customization of above code.
Add your text or image to the red text. You can also add another HTML code there.
1. behavior:
scroll - text will scroll
slide - text will slide
alternate - text will bounce back and forth
2. direction
You may change this to Left, Right, Up or Down
3. scrollamount/scrolldelay
More the scrollamount more the scrolling/sliding speed
4. bgcolor
It is a background color. Read about HTML color code picker here.
5. align
It may be middle, left or right
6.Width and Height
As per your needs
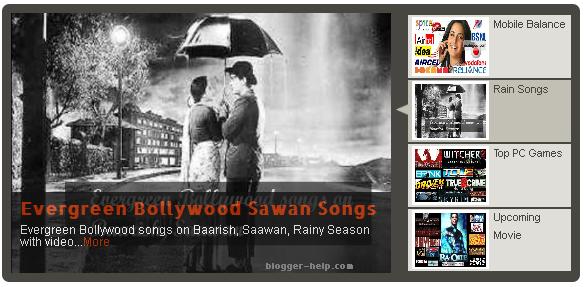

Installation
Step 1
Go to Dashboard > Layout > Edit HTML. Download template for backup. Add following code just BELOW]]></b:skin>
<style type='text/css'>
<b:if cond='data:blog.pageType != "item"'>
/* Feature Content */
#feature-wrapper{
float:left;
width:645px;
padding:0;
margin-bottom:20px;
}
.slide{
padding:0;
margin:0
}
#featured{
float:left;
width:480px;
height:310px;
padding-right:165px;
margin:0;
position:relative;
overflow:hidden;
background:#474640;
-webkit-border-radius:8px;
-moz-border-radius: 8px;
border-radius: 8px
}
#featured ul.ui-tabs-nav{
position:absolute;
top:0;
left:430px;
list-style:none;
padding:0;
margin:10px 0 0 10px;
width:195px;
height:290px;
overflow:auto;
overflow-x:hidden;
}
#featured ul.ui-tabs-nav li{
padding:2px 0 0 13px;
font-size:12px;
color:#111;
}
#featured ul.ui-tabs-nav li img{
float:left;
margin:2px 5px;
background:#fff;
padding:3px
}
#featured ul.ui-tabs-nav li span{
font-size:12px;
line-height:18px
}
#featured li.ui-tabs-nav-item a{
display:block;
height:70px;
text-decoration:none;
color:#474640;
background:#dfded8;
line-height:20px;
outline:none;
}
#featured li.ui-tabs-nav-item a:hover{
background:#c2c0b5
}
#featured li.ui-tabs-selected{
background:url(' https://blogger.googleusercontent.com/img/b/R29vZ2xl/AVvXsEhpxsTDvEGffPziMkkmk4SuCU9ZJRn4dcaFccC82_Ko99SOII6IuGhddE0jQDKsEmx1ajvjdv7rwtgm5ZPvqEfFmQdHELTMGwMX4Iu5yqyaVm_sts_DTFtNtTVQBaH9WK-hjRmUTUR80GI/s1600/arrow.png' ) center left no-repeat
}
#featured ul.ui-tabs-nav li.ui-tabs-selected a{
background:#c2c0b5
}
#featured .ui-tabs-panel{
width:425px;
height:290px;
position:relative;
padding:0;
margin:10px 0 0 10px;
.top:10px /* IE */
}
#featured .ui-tabs-panel img{
width:425px !important;
height:290px !important;
}
#featured .ui-tabs-panel .info{
position:absolute;
bottom:0;
left:0;
overflow:hidden;
height:90px;
width:425px;
background:#111;
opacity:0.8;
filter:alpha(opacity=80);
.width: 100%; /* IE */
}
#featured .ui-tabs-panel .info a.hideshow{
position:absolute;
font-size:11px;
color:#111;
right:10px;
top:-20px;
line-height:20px;
margin:0;
outline:none;
background:#dfded8
}
#featured .info h3{
font-size:20px;
font-family:"Allerta" ,arial ,sans-serif;
padding:5px 10px;
margin:0;
font-weight:bold;
overflow:hidden
}
#featured .info p{
margin:0 10px;
line-height:14px;
color:#fff
}
#featured .info a{
text-decoration:none;
color:#cd3301
}
#featured .info a:hover{
text-decoration:underline
}
#featured .ui-tabs-hide{
display:none
}
</b:if>
</style>
Step 2
Add following code just ABOVE </body>
<b:if cond='data:blog.pageType != "item"'>
<script src='http://ajax.googleapis.com/ajax/libs/jquery/1.3.2/jquery.min.js' type='text/javascript'/>
<script src='http://ajax.googleapis.com/ajax/libs/jqueryui/1.5.3/jquery-ui.min.js' type='text/javascript'/>
<script type='text/javascript'>
$(document).ready(function(){
$("#featured > ul").tabs({fx:{opacity: "toggle"}}).tabs("rotate", 5000, true);
});
</script>
</b:if>
Save your template.
Step 3
Now go to Page Elements > Add a gadget > HTML/JavaScript and add following there and save.
<div id='featured'>
<ul class='ui-tabs-nav'>
<li class='ui-tabs-nav-item ui-tabs-selected' id='nav-fragment-1'><a href='#fragment-1'><img alt="testing" height="60" src="http://www.mobigod.com/wp-content/uploads/2010/07/How-to-Check-Your-Account-Balance-on-Vodafone-Idea-BSNL-Reliance-GSM-Aircel-Airtel-Tata-Docomo-networks.jpg" width="80" /><span>Mobile Balance</span></a></li>
<li class='ui-tabs-nav-item' id='nav-fragment-2'><a href='#fragment-2'><img alt="testing" height="60" src="http://2.bp.blogspot.com/_tbHfaj1A058/THJK8Y2zSBI/AAAAAAAALjw/h-wCMIxEUig/s1600/pyar+hua+ikrar+hua+hai+1.JPG" width="80" /><span>Rain Songs</span></a></li>
<li class='ui-tabs-nav-item' id='nav-fragment-3'><a href='#fragment-3'><img alt="testing" height="60" src="http://3.bp.blogspot.com/_tbHfaj1A058/TSMgX-M1KWI/AAAAAAAAL7Q/AW6gc9IP1bI/s1600/mafia2.jpg" width="80" /><span>Top PC Games</span></a></li>
<li class='ui-tabs-nav-item' id='nav-fragment-4'><a href='#fragment-4'><img alt="testing" height="60" src="http://1.bp.blogspot.com/_tbHfaj1A058/TSMgWZPUPuI/AAAAAAAAL7M/RGj9UwEOdis/s1600/film%252Bcast%252Bcrew1.JPG" width="80" /><span>Upcoming Movie</span></a></li>
</ul>
<!-- First Content -->
<div class='ui-tabs-panel' id='fragment-1' style=''>
<img alt="testing" height="290" src="http://www.mobigod.com/wp-content/uploads/2010/07/How-to-Check-Your-Account-Balance-on-Vodafone-Idea-BSNL-Reliance-GSM-Aircel-Airtel-Tata-Docomo-networks.jpg" width="420" />
<div class='info'>
<h3><a href='http://www.mobigod.com/how-to-check-your-account-balance-on-vodafone-idea-bsnl-reliance-gsm-aircel-airtel-tata-docomo-networks.html'>Check Mobile Balance</a></h3>
<p>How to Check Your Account Balance on Vodafone / Idea / BSNL / Reliance GSM / Aircel / Airtel / Tata Docomo / Virgin Mobile / Spice networks?...<a href='http://www.mobigod.com/how-to-check-your-account-balance-on-vodafone-idea-bsnl-reliance-gsm-aircel-airtel-tata-docomo-networks.html'>More</a></p>
</div>
</div>
<!-- Second Content -->
<div class='ui-tabs-panel ui-tabs-hide' id='fragment-2' style=''>
<img alt="testing" height="290" src="http://2.bp.blogspot.com/_tbHfaj1A058/THJK8Y2zSBI/AAAAAAAALjw/h-wCMIxEUig/s1600/pyar+hua+ikrar+hua+hai+1.JPG" width="420" />
<div class='info'>
<h3><a href='http://film-cast.blogspot.com/2010/08/evergreen-bollywood-songs-on-baarish.html'>Evergreen Bollywood Sawan Songs</a></h3>
<p>Evergreen Bollywood songs on Baarish, Saawan, Rainy Season with video...<a href='http://film-cast.blogspot.com/2010/08/evergreen-bollywood-songs-on-baarish.html'>More</a></p>
</div>
</div>
<!-- Third Content -->
<div class='ui-tabs-panel ui-tabs-hide' id='fragment-3' style=''>
<img alt="testing" height="290" src="http://3.bp.blogspot.com/_tbHfaj1A058/TSMgX-M1KWI/AAAAAAAAL7Q/AW6gc9IP1bI/s1600/mafia2.jpg" width="420" />
<div class='info'>
<h3><a href='http://www.systemrequirements.in/'>Upcoming Top PC Games</a></h3>
<p>SystemRequirements.in is a site where you can get the most accurate reuirements for PC...<a href='http://www.systemrequirements.in/'>More</a></p>
</div>
</div>
<!-- Fourth Content -->
<div class='ui-tabs-panel ui-tabs-hide' id='fragment-4' style=''>
<img alt="testing" height="290" src="http://1.bp.blogspot.com/_tbHfaj1A058/TSMgWZPUPuI/AAAAAAAAL7M/RGj9UwEOdis/s1600/film%252Bcast%252Bcrew1.JPG" width="420" />
<div class='info'>
<h3><a href='http://film-cast.blogspot.com/'>Upcoming Hollywood / Bollywood movies</a></h3>
<p>Complete discription of top upcoming movies both from Hollywood and Bollywood...<a href='http://film-cast.blogspot.com/'>More</a></p>
</div>
</div>
</div>
Customization for Step 3
Red > Image URL
Pink > Image alter text
Blue > Post URL
Green > Title of Posts
Bold and italic > Description of posts
Note: To fit to your template you have to change the width/s given in the Step 1.
Other Versions of Featured Content Slider
Discussions